A Star in UE4 - The Material
Table of contents
- Introduction
- Today’s goal
- Base configuration
- Sunspots
- Increasing brightness
- Final material:
- Conclusion
Introduction
Hi everyone.
This is the first post of a series on ‘how to create a “realistic” star in Unreal Engine 4’.
I’m using UE 4.27.2 for those wondering.
First, a little disclaimer:
I do not claim that my variant is THE best or THE most optimized but it works quite well :)
Today’s goal
Base configuration
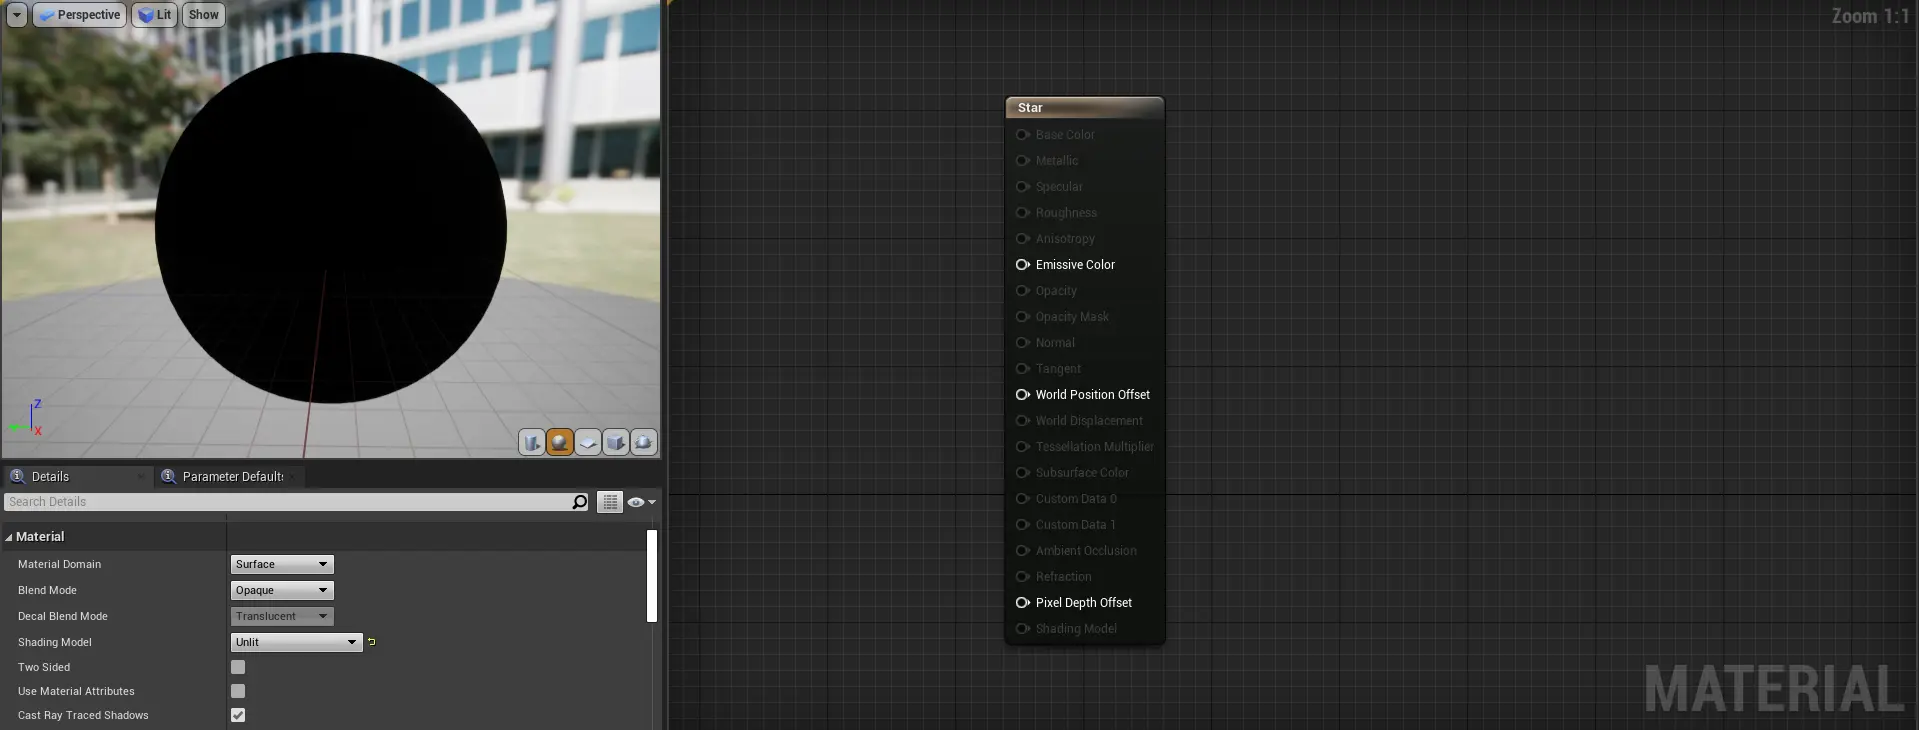
First, we need a new material. I called it ‘M_Star’ for Unreal’s naming convention.
In the material settings under the ‘Material’ group I set the ‘Material Domain’ to ‘Surface’ and the ‘Blend Mode’ to ‘Opaque’.
The ‘Decal Blend Mode’ then locks in to ‘Translucent’ and I set the ‘Shading Model’ to ‘Unlit’.
After all that, your material should look like this:
Next, we need a ‘VectorParameter’. You can use a constant color as well, but I have my plans for the future - watch out for the next post ;)
For a typical star/sun color we can set its default value to be 1.0, 0.75, 0.0, 1.0 .
If you now plug in the first (RGBA) output of the ‘Param’ node into ‘Emissive Color’ we see…
a yellow dot.
But bare with me, if we add a multiply node (right click -> multiply) and set its A or B param to 1000, you can see a far better interpretation.
Sunspots
The one thing I don’t like is repetition so therefore I am going to use a lot of noise to simulate sunspots.
Most people tend to use a texture but I’d like to have a lot more ‘uniqueness’.
For the sunspots themselves, I used a total of three different Noise-nodes:
- Simplex
- Gradient
- Voronoi
The first two are used to create the small little ‘dots’, and the last one perfectly depicts the large spots.
Create those nodes by right-clicking -> noise and on the left side, set ‘Function’ to the corresponding noise function. Then:
First: Click on the Simplex-Noise and set its scale to 2.0, the Levels to 1 and ‘Output Min’ to 0.0
Second: Add the first two noises together and multiply them by 10. Why? It’s a surprise tool that can help us later…
Third: Multiply that result with the Voronoi node which has set its scale to 0.025, its turbulence off (false), and its output min to 0.0 .
Last but not least: clamp the result to (Min=0)(Max=1) (default settings)
To get a preview of the noise texture we can plug it into our emissive color output and watch the magic happen. Isn’t it beautiful?

If we now multiply that with out yellow color and apply out 1000 times scaling afterward, it will look reasonably good, but there is a catch! Do you notice the flickering?
Rotation
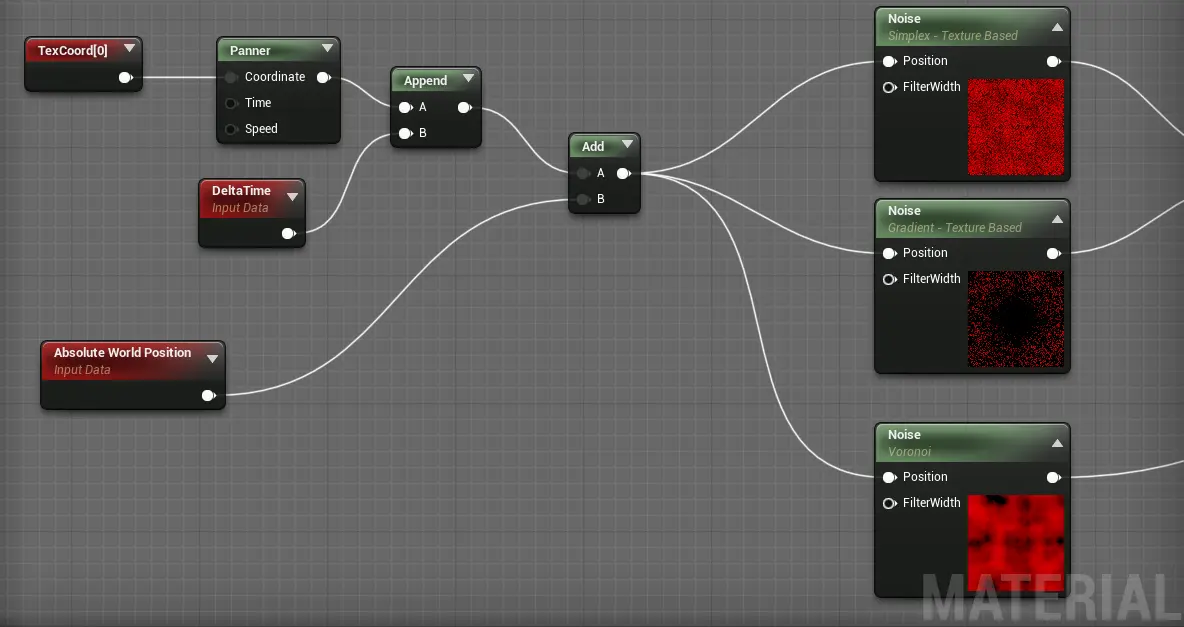
Let us first give the spots a bit of movement an then address the flickering.
All we have to do is a simple panning on our texture coordinates, and we are good to go, right?
Sadly, no, but that’s the core idea.
Two Problems:
- If we were to do that, the edges of the texture would not blend seemlessly
- and second: the noise-node requires a 3D Vector and we only provided it with two dimensions.
The second problem has an easy fix: just append something as z-coordinate to your vector. In my case I used DeltaTime but use whatever you feel like.
Well, to get a seemless transition we can get the ‘Absolute World Position’ and use that as a starter-position for every pixel. Simply add that node to the structure described above et voila. We have a rotating and changing star.
The flickering
Getting rid of the flickering turned out to be a more challenging task then I had anticipated. The basic idea is to only show the spots on closer inspection. Of course, we could just add 1 to our noise texture when we are far enough away and then clamp it to get rid of all the noise, but that would be hideous!
Instead, we can compute a function where the distance to the oject gives us a value between 0 and 1 to add to our texture to lighten it. A possibility would be a linear interpolation where we need to define a fixed distance from our object.
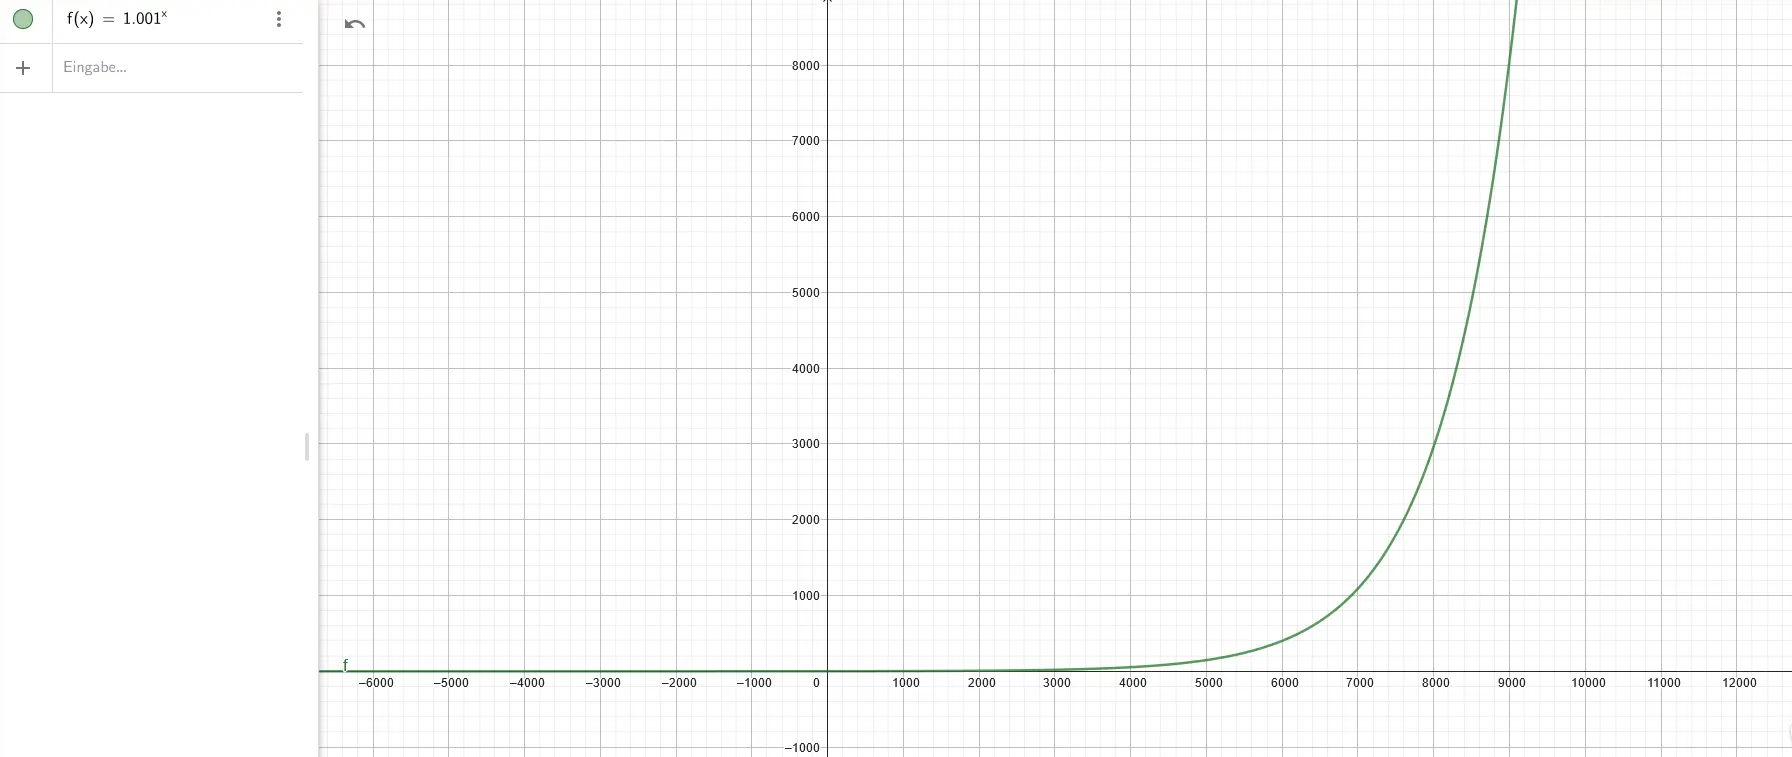
I went for a exponential function instead so we have a large window where we can see the spots and have a smooth but quick transition to the ‘uniform/non-flickering’ star.
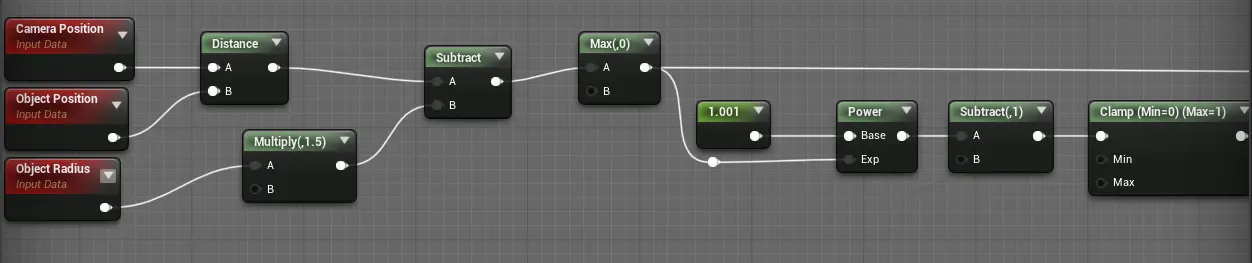
I think I’m going to rush through this since nobody wants to read math. Here it is:
- Start with the distance between ‘Camera Position’ and ‘Object Position’
- Subtract 1.5x ‘Object Radius’ from it
- Eliminate negatives (use a Max-node with B as 0.0)
- Use it as an exponent to the base 1.001 (use a Power-node)
- Subtract one and clamp it between 0 and 1
- Add it to the noise texture after the clamp
Phew. Enough math for today.
Here is the final calculation:
Math alert! Graph ahead...
For all you math nerds ;p
Increasing brightness
Now, if we go back to our material, we can only see the sunspots up close, and it’s quite a challenge to move that close since at 1000x emission scaling, it really singes my eyes.
What we can do now is scale out brightness with distance from the camera. Conveniently, we have this value just sitting around, so to speak.
By following these steps, we can achieve a smoothly scaling brightness that allows us to zoom in and appreciate the beautiful movement of the sun with both big and small sunspots.
Final material:
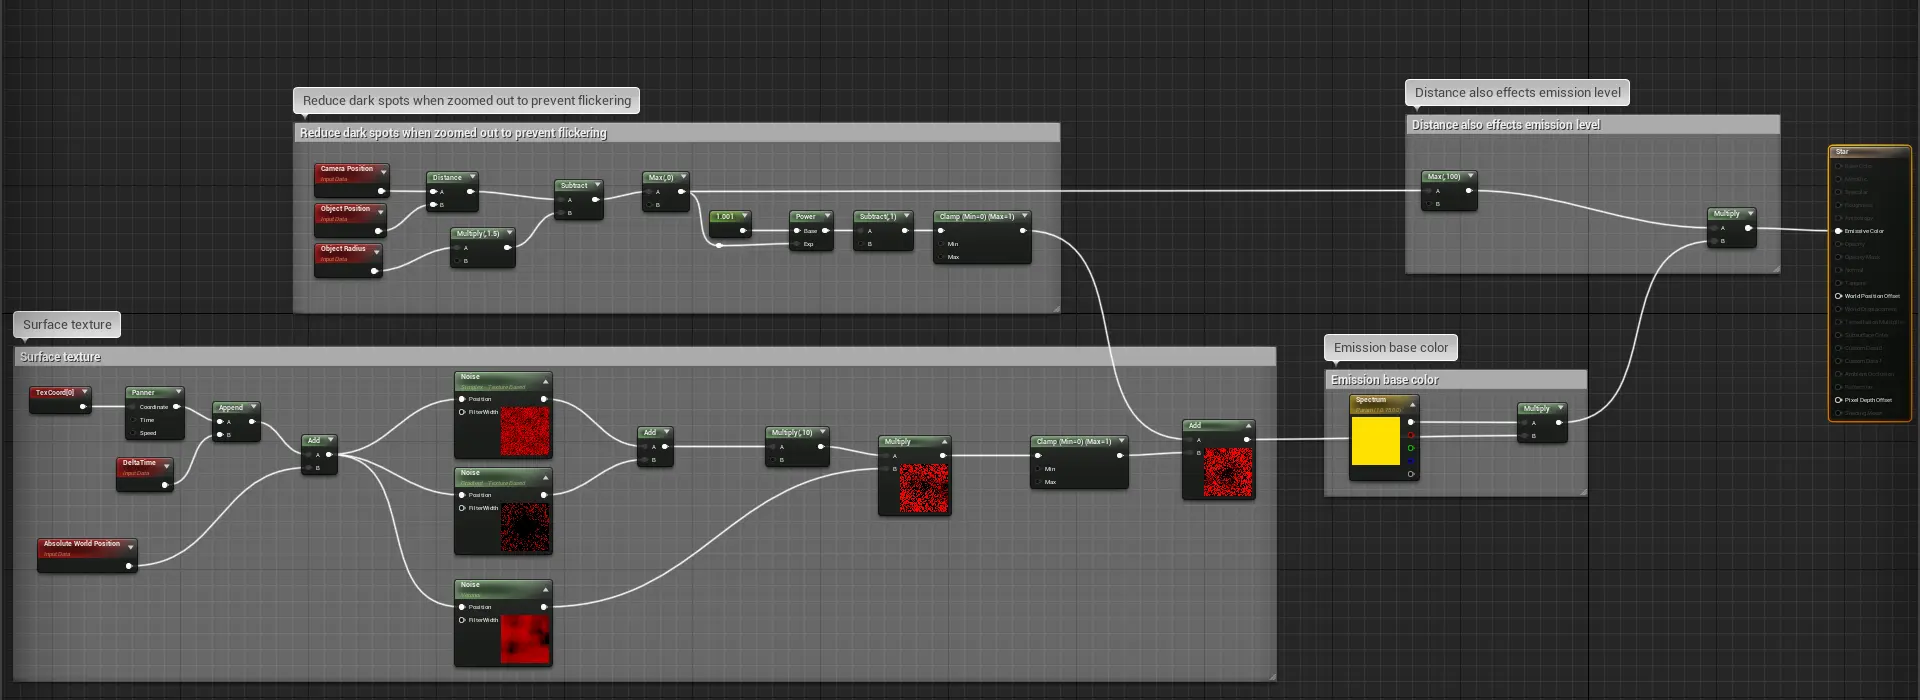
Conclusion
That’s it for today’s post. We created a simple but quite realistic star using noise textures and some math. Next time I’ll focus on the actual lighting of the scene and changing the color of the star, based on its mass. Until then, have fun enjoying the sun!
If you have any questions or suggestions, please feel free to write an E-Mail or hit me up on GitHub.
Thanks for reading and see you in the next post!